Builder 패턴은 객체 생성의 복잡성을 줄이기 위해 사용되는 디자인 패턴이다. 특히, 내부 속성이 많거나, 여러 단계의 초기화 과정이 필요한 복잡한 객체를 생성할 때 유용하다. Builder 패턴은 객체의 생성과정과 표현을 분리하여, 동일한 생성 절차에서 다양한 표현을 만들 수 있다.
“세심하게 조립된 요소들로 완전한 존재를 창조하는 과정”
Builder 패턴은 다음과 같은 상황에서 사용하기 좋다:
- 복잡한 객체 생성이 필요한 경우: * 객체 생성 과정이 복잡하고, 많은 단계가 필요한 경우 * 예를 들어, 복잡한 초기화 과정을 거쳐야 하는 객체를 생성할 때 유용
- 생성자에 매개변수가 많거나, 매개변수의 의미를 명확하게 하고 싶은 경우: * 생성자에 많은 매개변수를 전달해야 하는 경우, 가독성과 유지보수성을 위해 Builder 패턴을 사용하면 좋다. * 각 매개변수를 설정하는 메서드를 사용함으로써, 객체 생성 시 어떤 값이 어떤 필드에 설정되는지 명확하게 할 수 있다.
- 객체의 일부 속성만 설정하거나, 다양한 조합의 속성을 설정해야 하는 경우: * 일부 속성만을 설정하고 나머지는 기본값으로 유지해야 할 때 유용 * 객체의 다양한 조합을 쉽게 생성할 수 있다.
- 객체의 불변성을 보장해야 하는 경우: * 객체를 생성한 후 변경할 수 없도록 불변 객체를 생성해야 하는 경우 * 모든 필드가 설정된 후 객체가 생성되므로, 생성된 객체는 변경할 수 없음
- 객체를 단계적으로 생성해야 하는 경우: * 객체를 생성하는 과정에서 단계적으로 설정이 필요한 경우. * 예를 들어, 복잡한 사용자 인터페이스 구성 요소나 데이터베이스 연결 설정 등의 경우에 유용
- 객체 생성 로직을 클라이언트 코드에서 분리하고 싶은 경우: * 객체 생성 로직을 클라이언트 코드와 분리하여, 코드의 가독성과 유지보수성을 높이고 싶은 경우 * 객체 생성에 필요한 로직이 Builder 클래스에 캡슐화되어 클라이언트 코드에서 분리됨
장점
- 객체 생성의 유연성: 다양한 설정을 가진 객체를 쉽게 생성할 수 있습니다. 필요한 속성만 설정하고, 나머지는 기본값으로 유지할 수 있음
- 가독성 향상: 복잡한 객체를 생성하는 코드를 직관적으로 작성할 수 있습니다. 메서드 체이닝을 통해 설정 과정이 명확
- 불변 객체 생성: 생성된 객체는 변경할 수 없으므로, 상태 변경으로 인한 오류를 방지할 수 있음
- 분리된 객체 생성 로직:객체 생성 로직이 클라이언트 코드와 분리되므로, 코드의 유지보수성이 향상
단점
- 코드 복잡성 증가: Builder 클래스를 추가로 작성해야 하므로, 코드의 복잡성이 증가할 수 있음
- 필수 속성 누락 위험: 필수 속성을 설정하지 않은 채로 객체를 생성할 위험이 있습니다. 이를 방지하기 위해 필수 속성 검증 로직을 추가해야 할 수 있음
예제 코드:
아래 예제에서는 Builder 패턴을 사용하여 House 객체를 생성하고 House는 여러 속성을 가질 수 있으며, HouseBuilder를 사용하여 유연하게 설정할 수 있음
House 클래스 (Product)
public class House {
    private String foundation;
    private String structure;
    private String roof;
    private boolean furnished;
    private boolean painted;

    // private 생성자, 빌더를 통해서만 객체 생성
    private House(HouseBuilder builder) {
        this.foundation = builder.foundation;
        this.structure = builder.structure;
        this.roof = builder.roof;
        this.furnished = builder.furnished;
        this.painted = builder.painted;
    }

    @Override
    public String toString() {
        return "House [foundation=" + foundation + ", structure=" + structure
            + ", roof=" + roof + ", furnished=" + furnished + ", painted=" + painted + "]";
    }

    // Builder 클래스 (ConcreteBuilder)
    public static class HouseBuilder {
        private String foundation;
        private String structure;
        private String roof;
        private boolean furnished;
        private boolean painted;

        public HouseBuilder setFoundation(String foundation) {
            this.foundation = foundation;
            return this;
        }

        public HouseBuilder setStructure(String structure) {
            this.structure = structure;
            return this;
        }

        public HouseBuilder setRoof(String roof) {
            this.roof = roof;
            return this;
        }

        public HouseBuilder setFurnished(boolean furnished) {
            this.furnished = furnished;
            return this;
        }

        public HouseBuilder setPainted(boolean painted) {
            this.painted = painted;
            return this;
        }

        public House build() {
            return new House(this);
        }
    }
}
// Client 코드
public class BuilderPatternDemo {
    public static void main(String[] args) {
        House house = new House.HouseBuilder()
                .setFoundation("Concrete")
                .setStructure("Wood")
                .setRoof("Shingles")
                .setFurnished(true)
                .setPainted(true)
                .build();

        System.out.println(house);
    }
}
동작 과정
- HouseBuilder 객체 생성: * 클라이언트는 HouseBuilder 객체를 생성하고, 필요한 속성을 설정 * 각 설정 메서드는 this를 반환하여 메서드 체이닝을 가능하게 함
- House 객체 생성: * build() 메서드를 호출하여 House 객체를 생성합니다. House의 private 생성자는 HouseBuilder를 사용하여 객체를 초기화
- 객체 사용: * 생성된 House 객체는 설정된 속성들을 가지며, 불변 객체로 사용
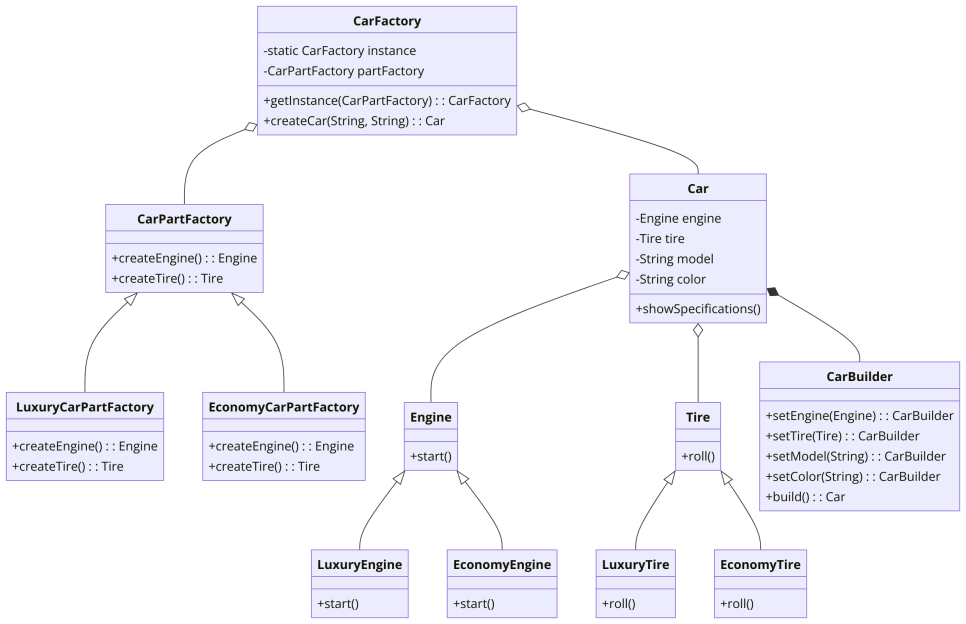
예시: 자동차 제조 시스템
Builder 패턴은 다양한 다른 디자인 패턴과 함께 사용될 수 있다. 특히, Abstract Factory 패턴과 Singleton 패턴과 결합하여 더 강력하고 유연한 객체 생성 메커니즘을 제공할 수 있다. 다음은 Builder 패턴과 함께 Abstract Factory 패턴과 Singleton 패턴을 사용하는 예시
- Abstract Factory 패턴
- 자동차의 부품(엔진, 타이어 등)을 생성하는 인터페이스를 정의
interface CarPartFactory {
    Engine createEngine();
    Tire createTire();
}

class LuxuryCarPartFactory implements CarPartFactory {
    @Override
    public Engine createEngine() {
        return new LuxuryEngine();
    }

    @Override
    public Tire createTire() {
        return new LuxuryTire();
    }
}

class EconomyCarPartFactory implements CarPartFactory {
    @Override
    public Engine createEngine() {
        return new EconomyEngine();
    }

    @Override
    public Tire createTire() {
        return new EconomyTire();
    }
}

interface Engine {
    void start();
}

interface Tire {
    void roll();
}

class LuxuryEngine implements Engine {
    @Override
    public void start() {
        System.out.println("Luxury engine starting...");
    }
}

class EconomyEngine implements Engine {
    @Override
    public void start() {
        System.out.println("Economy engine starting...");
    }
}

class LuxuryTire implements Tire {
    @Override
    public void roll() {
        System.out.println("Luxury tire rolling...");
    }
}

class EconomyTire implements Tire {
    @Override
    public void roll() {
        System.out.println("Economy tire rolling...");
    }
}
- Builder 패턴
- 자동차 객체를 구성하는 빌더를 정의
class Car {
    private Engine engine;
    private Tire tire;
    private String model;
    private String color;

    private Car(CarBuilder builder) {
        this.engine = builder.engine;
        this.tire = builder.tire;
        this.model = builder.model;
        this.color = builder.color;
    }

    public void showSpecifications() {
        System.out.println("Car model: " + model);
        System.out.println("Car color: " + color);
        engine.start();
        tire.roll();
    }

    public static class CarBuilder {
        private Engine engine;
        private Tire tire;
        private String model;
        private String color;

        public CarBuilder setEngine(Engine engine) {
            this.engine = engine;
            return this;
        }

        public CarBuilder setTire(Tire tire) {
            this.tire = tire;
            return this;
        }

        public CarBuilder setModel(String model) {
            this.model = model;
            return this;
        }

        public CarBuilder setColor(String color) {
            this.color = color;
            return this;
        }

        public Car build() {
            return new Car(this);
        }
    }
}
- Singleton 패턴
- 자동차 제조 공장을 단일 인스턴스로 제한
class CarFactory {
    private static CarFactory instance;
    private CarPartFactory partFactory;

    private CarFactory(CarPartFactory partFactory) {
        this.partFactory = partFactory;
    }

    public static CarFactory getInstance(CarPartFactory partFactory) {
        if (instance == null) {
            instance = new CarFactory(partFactory);
        }
        return instance;
    }

    public Car createCar(String model, String color) {
        Engine engine = partFactory.createEngine();
        Tire tire = partFactory.createTire();
        return new Car.CarBuilder()
                .setEngine(engine)
                .setTire(tire)
                .setModel(model)
                .setColor(color)
                .build();
    }
}
- Client 코드
- 위의 모든 요소를 결합하여 사용
public class Main {
    public static void main(String[] args) {
        // Abstract Factory 생성
        CarPartFactory luxuryPartFactory = new LuxuryCarPartFactory();
        CarPartFactory economyPartFactory = new EconomyCarPartFactory();

        // Singleton 패턴을 사용하여 CarFactory 생성
        CarFactory luxuryCarFactory = CarFactory.getInstance(luxuryPartFactory);
        CarFactory economyCarFactory = CarFactory.getInstance(economyPartFactory);

        // Builder 패턴을 사용하여 Car 객체 생성
        Car luxuryCar = luxuryCarFactory.createCar("Luxury Model", "Black");
        Car economyCar = economyCarFactory.createCar("Economy Model", "White");

        // Car 객체의 사양 출력
        luxuryCar.showSpecifications();
        economyCar.showSpecifications();
    }
}
관련 패턴
- Factory Method 패턴
- Factory Method 패턴은 객체 생성의 책임을 서브클래스에 넘기는 패턴이고 Builder 패턴은 복잡한 객체를 단계적으로 생성하는 데 사용되지만, Factory Method 패턴은 객체 생성을 위한 인터페이스를 정의하고, 이를 구현하는 서브클래스가 구체적인 객체 생성을 담당한다. Builder 패턴과 함께 사용하여 객체 생성의 유연성을 높일 수 있습니다. Factory Method를 사용하여 적절한 Builder를 선택하고, Builder 패턴을 통해 객체를 생성하는 방식이다.
- Abstract Factory 패턴
- Abstract Factory 패턴은 관련 객체의 군을 생성하기 위한 인터페이스를 제공하며. 클라이언트는 구체적인 클래스에 의존하지 않고, 인터페이스를 통해 객체를 생성한다. Abstract Factory 패턴은 여러 종류의 객체를 생성할 때 유용하며, Builder 패턴과 결합하여 객체 생성 과정을 더 유연하게 관리할 수 있다. 예를 들어, Abstract Factory에서 여러 Builder를 제공하고, 이를 통해 다양한 객체를 생성할 수 있음
- Prototype 패턴
- Prototype 패턴은 기존 객체를 복제하여 새로운 객체를 생성하는 패턴이다. 새로운 객체를 생성하는 데 드는 비용이 큰 경우 유용하다. Builder 패턴은 복잡한 객체를 생성하는 데 사용되며, Prototype 패턴은 기존 객체를 복제하여 새로운 객체를 빠르게 생성할 때 사용된다. 두 패턴을 함께 사용하면, 복잡한 객체를 처음에는 Builder 패턴으로 생성하고, 이후에 복제가 필요할 때 Prototype 패턴을 사용할 수 있음
- Singleton 패턴
- Singleton 패턴은 클래스의 인스턴스를 하나만 존재하도록 보장한다. 전역 접근점을 제공하며, 시스템 내에서 객체가 단 하나만 필요할 때 사용됩니다. Builder 패턴과 Singleton 패턴을 함께 사용하여, 단일 인스턴스에서 Builder를 사용해 객체를 생성할 수 있다. 예를 들어, 객체 생성에 사용하는 설정 정보를 Singleton으로 관리하고, 이를 Builder와 함께 사용할 수 있음
- Composite 패턴
- Composite 패턴은 객체들을 트리 구조로 구성하여 부분-전체 계층을 표현한다. 클라이언트가 개별 객체와 객체 그룹을 동일하게 처리할 수 있습니다. Builder 패턴을 사용하여 Composite 패턴의 트리 구조를 단계적으로 생성할 수 있다. 복잡한 트리 구조를 생성하는 데 Builder 패턴이 유용